
How To Repair A Dryer Vent Hose?
- Posted by ziad
- On February 8, 2022
- 0 Comments
- cleaning, dryer vent cleaning, Dryer vent hose
The Purpose Of A Dryer Vent Hose:
A dryer vent hose (or flex transition hose) moves the hot exhaust air from the dryer through the hose and expels it to the outside of your house or apartment. If either side of the vent hose falls off (vent hose on dryer side or vent hose on wall side) the hot air exhaust will fill the room and lint may be noticeable on the floor. Without a vent hose attached to your dryer, lint can build up in your clothes dryer over time and cause efficiency and safety issues.
5 Steps To Repair Your Dryer Vent Hose:
Step 1. Unplug Dryer
The first step of dryer vent repairs is always to unplug the dryer from the wall outlet.
You don’t want to damage the cord or get electrocuted while you repair the vent.
Step 2. Pull Back Dryer
The second step is to pull back the dryer so you can access the flex vent behind the dryer.
If you have a really tight area, you may have no choice but to climb over the dryer. But with most dryers, you should be able to pull it out enough so that you can sidestep behind it.
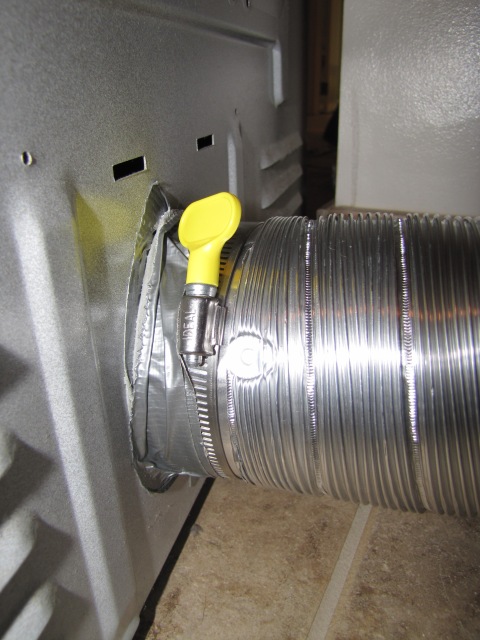
Step 3. Disconnect Dryer Vent Hose
The third step is to disconnect the flex vent behind the dryer.
There are usually metal clamps that will need to be loosened with a phillips screwdriver.
There also may be aluminum tape that needs to be removed. Which can be be peeled off (or cut with a knife).
Step 4. Repair Crushed Flex Metal Dryer Vent
If your flex vent is made out of flexible metal (rather than foil type), if it is crushed, you probably can just reach inside the vent and bend it back into shape.
And if there is a rip or hole in the vent, you should be able to use aluminum tape to cover it.
Step 5. Fix ‘Foil Type’ Dryer Vent Hose
If the flex vent made out of aluminum foil (a much more flexible type of vent than metal) than it probably won’t be crushed like what is common with the flex metal vent.
However, foil type vents have metal wires going through the vent which gives it some strength and which can get damaged and warped.
Also, the foil can easily get ripped with holes and tears. Any holes should be repairable with aluminum foil tape. But if the wiring is damaged, you may just need to replace the dryer vent.
Step 6. Clean Dryer Vent If Needed
After repairing the flex vent behind the dryer, it is a good idea to clean the vent before re-installing it. There are homeowner DIY dryer vent cleaning tools that uses a brush attachment on a cordless drill.
But since flex vents are so short, you may even be able to just clean out any lint with your hand — or use a simple kitchen cleaning type brush.
Step 7. Reconnect Dryer Duct
After repairing the dryer vent (and possibly cleaning it of highly flammable lint) you should reconnect it to the dryer.
The best way to install a flex vent is by using adjustable metal clamps, and then using aluminum foil tape over the clamp for a tight seal.
Step 8. Push Back Dryer
After reconnecting the dryer vent, you should push back the dryer.
If the dryer vent looks crushed, you can try manipulating the vent with a long broom or stick to get it in a configuration where it isn’t crushed.
Once you are sure that the dryer vent won’t get crushed, you can push back the dryer to its original location.

0 Comments